Ollas are an eco-friendly irrigation solution made of terracotta.
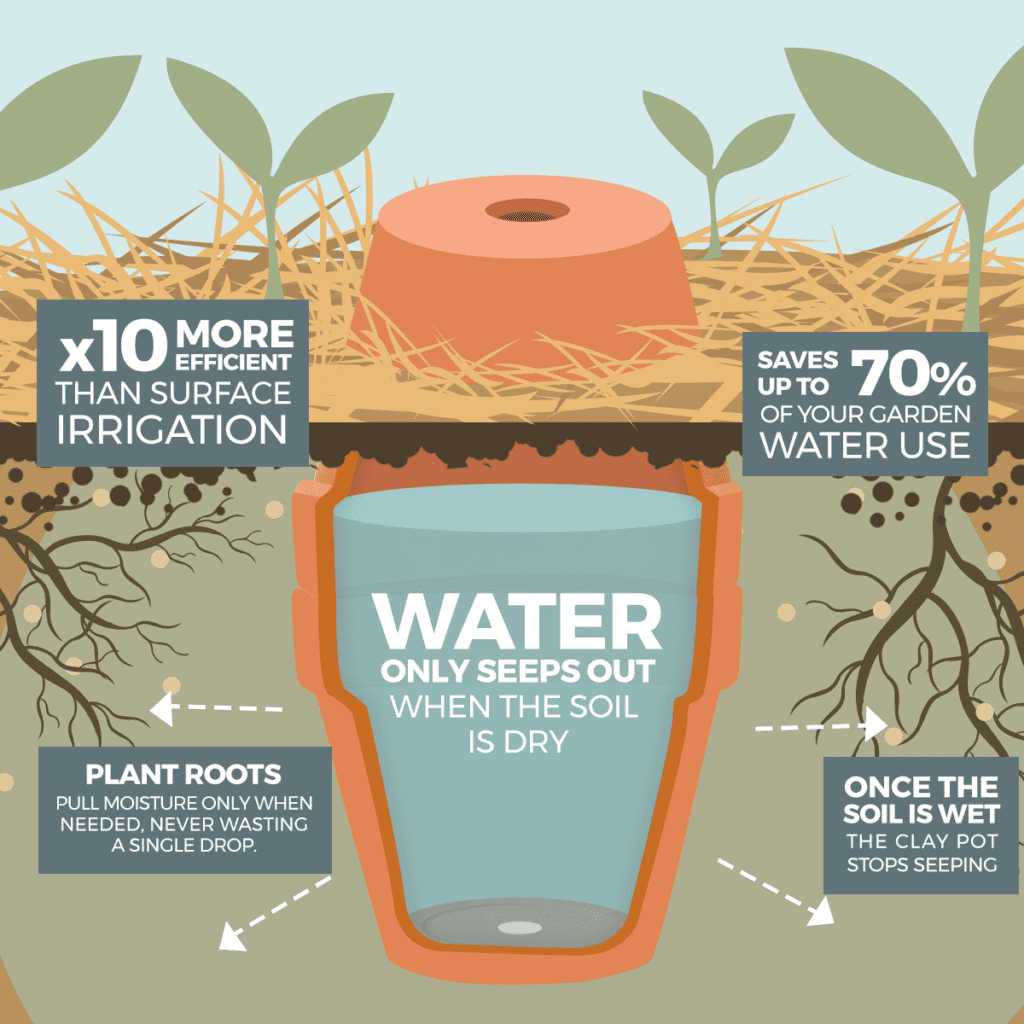
Many ancient civilizations used ollas for gardening from the Chinese, Egyptians, and Mayans. Watering gardens with ollas can cut water use by 90 percent compared to surface irrigation. Ollas minimize water use by getting water to the plant as needed, with little or no loss to evaporation or runoff.
“Filled with water, a buried, unglazed, porous clay plot provides controlled irrigation by capillary flow to plants planted near it.”
David A. Bainbridge, Gardening with Less Water

Tips for Using Ollas
- Ollas can be buried in the ground, added to raised beds, or placed in the center of containers.
- Space ollas every 2–3 feet in your garden for best irrigation.
- Refill your olla once or twice a week depending on the water level.
- Never let the olla water level go below half full.
- Only fill the olla with water. Do not add liquid fertilizer inside the olla. It will clog the terracotta capillaries.
- Ollas can be purchased in different sizes or you can make your own with two clay pots.
- Remove ollas and store in a dry place if your soil freezes.
- In most of Los Angeles, the soil doesn’t freeze. Ollas can remain in the soil year round.
- In Los Angeles, email [email protected] or check out Pottery Mfg. & Dist. Inc.


How to Make an Olla from Two Clay Pots
Materials needed
- Two unglazed terracotta clay plots of the same size
- Tape
- 100% silicone sealant or caulk
- Pencil
- Rubber glove
- Water
- Cork or plug for the top pot’s hole
Instructions
1. Seal the bottom pot’s drainage hole
-
- Cover the outside of the hole with a piece of tape.
- Fill the inside of the hole with silicone sealant.


2. Join the two pots
-
- Place the top pot upside down so the two rims meet.
- Find a snug alignment and mark it with a pencil.
- Apply a generous ring of silicone around the rim of the bottom pot.
- Press the top pot gently upside down at the marked alignment.
- Using a rubber glove, rub the excess silicone with your finger to fill in any gaps and create a leak-proof seal between the two pots.
- Allow 24 hours for the silicon to fully cure.


3. Tests for water leaks
- Remove the tape from the bottom pot.
- Fill the top hole with water.
- If there is a water leak, drain pots, let dry, and add more silicon sealant.

4. Install your olla
- Dig a hole in your garden deep enough to bury the olla with only the top inch exposed.
- Fill it with water and plug the top hole with a cork to prevent evaluation.
- Keeping the hole covered prevents insects or soil from getting inside the olla.

Add a Mini-Olla to a Herb Container
Materials needed
- Mini-olla or terracotta urn from S&S Worldwide or Amazon
- Container or pot for growing kitchen herbs
- Cork or plug for 1-1/8 inch urn top hole
- Herb plants such as cilantro, basil, thyme, or oregano
- Water
Instructions
1. Prepare herb container
-
- Add potting soil to container or pot
- Bury the mini-olla in the container’s center with only the top half-inch exposed.
- Fill mini-olla with water.

2. Plant herbs in container
-
- Add herb seeds or transplant herb starter plants into the soil around the mini-olla.
- If sowing seeds, water the soil directly for a couple of weeks for the seeds to germinate and for the new roots to attach to the mini-olla.
- Regularly fill the mini-olla with water. Never let the water level go below half full.


Do you like this page?